Streamlining Your Workflow: Deleting Subtasks in Jira
Jira, a popular project management and issue tracking tool, empowers teams to efficiently manage tasks and projects. While creating tasks and subtasks is essential, knowing how to manage them effectively is equally crucial. In this guide, we will walk you through the process of deleting subtasks in Jira, helping you maintain a clean and organized project workspace.
How to delete subtask in jira?
1. The Significance of Subtasks in Jira
Before we dive into the deletion process, it's important to understand the role of subtasks in Jira.
Subtasks allow you to break down larger tasks into more manageable components, providing granularity to your project planning and execution.
2. Navigating to Your Subtasks
To delete a subtask in Jira, you'll first need to navigate to the specific issue that contains the subtask. Follow these steps:
-
Login to Jira: Access your Jira account and log in to the platform.
-
-
Select the Project: Locate the project that contains the subtask you want to delete.
-
-
Find the Issue: Identify the main issue (the parent issue) that has the subtask you wish to remove.
-
-
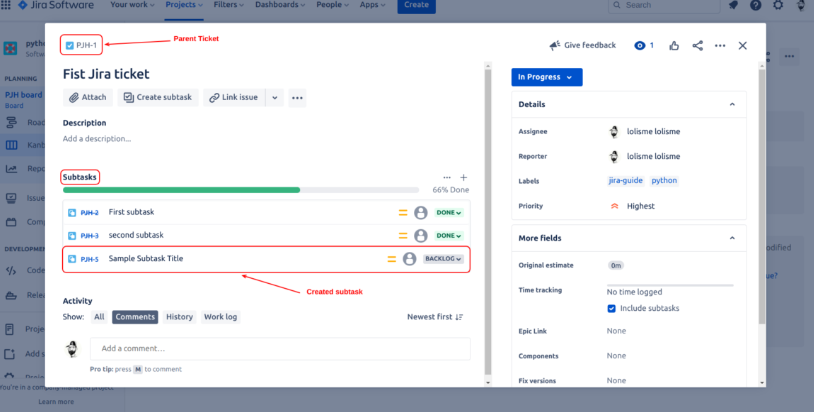
Access the Subtasks: Once you've selected the parent issue, you'll find the list of subtasks associated with it.
3. Deleting a Subtask
Now that you've located the subtask, follow these steps to delete it:
-
Open the Subtask: Click on the subtask you want to delete to open it and view its details.
-
-
More Options: Look for the "More" option, usually represented by three dots or ellipses, within the subtask details. Click on it to reveal additional actions.
-
-
Delete Subtask: From the "More" menu, select the "Delete" or "Delete Subtask" option. Jira will prompt you to confirm the deletion.
-
-
Confirm Deletion: Confirm your intent to delete the subtask. Jira will typically ask you to confirm by clicking a "Delete" button or by typing "delete" to confirm.
4. Review Before Deletion
Before confirming the deletion of a subtask, take a moment to review its details. Ensure that you are indeed deleting the correct subtask, as deleted subtasks cannot be recovered, and any associated information will be lost.
Deleting Multiple Subtasks:If you have several subtasks to delete within the same issue, repeat the process for each subtask individually. Jira does not currently offer a bulk delete option for subtasks.
5. Permissions and Roles
To delete subtasks, you must have the appropriate permissions in Jira. Project roles and permissions are typically managed by Jira administrators. If you encounter issues with deleting subtasks, check with your project administrator to ensure you have the necessary access.
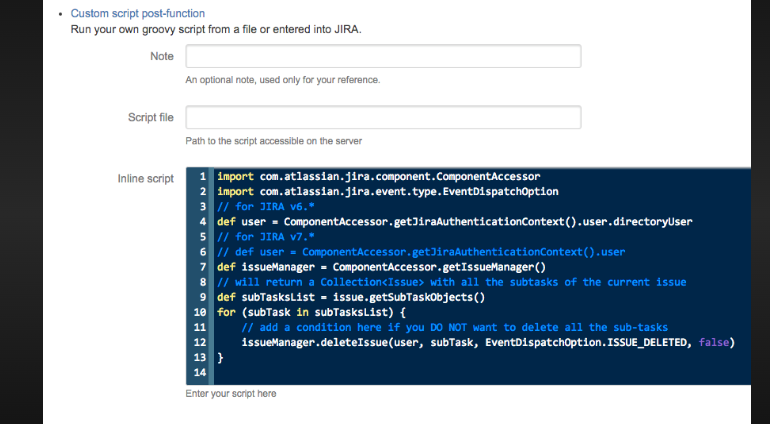
Using Automation Rules: For advanced Jira users, automation rules can be set up to automatically delete subtasks under specific conditions. This can help streamline project management by automating repetitive tasks.
Reorganizing Your Project: After deleting subtasks, consider reorganizing your project's tasks and subtasks to maintain clarity and efficiency. This may involve reassigning tasks, updating due dates, or creating new subtasks as needed.
Jira, a popular project management and issue tracking tool
Deleting subtasks in Jira is a straightforward process that allows you to keep your project workspace organized and focused on what matters most. By following the steps outlined in this guide, you can efficiently manage your subtasks, ensuring that your project stays on track and your team remains productive. So, leverage the power of Jira to simplify your project management, and delete subtasks with confidence to maintain a clean and efficient workflow.