How to Change Songs on AirPods Pro: A Step-by-Step Guide
Apple's AirPods Pro are renowned for their seamless integration with Apple devices and their convenient touch controls. If you're wondering how to change songs on your AirPods Pro without reaching for your phone or other devices, you're in the right place. In this comprehensive guide, we'll walk you through the various methods to change songs on AirPods Pro, ensuring you can enjoy your music effortlessly.
How to change song on airpods pro?
1. Understanding AirPods Pro Touch Controls
AirPods Pro are equipped with touch-sensitive controls on both earbuds.
These controls allow you to perform various functions, including changing songs, adjusting volume, answering calls, and activating Siri.
To change songs, you'll use specific touch gestures on the earbuds.
2. Method 1: Using Automatic Ear Detection
AirPods Pro are designed with a feature called "Automatic Ear Detection." This feature detects when the earbuds are placed in your ears and pauses or plays music accordingly. It also enables song changes when combined with touch controls:
-
Play/Pause: To play or pause music, simply double-tap on either of the AirPods Pro earbuds while they are in your ears.
-
-
Next Track: To skip to the next song, double-tap on the right earbud.
-
-
Previous Track: Unfortunately, there is no default gesture for going back to the previous track using touch controls. However, you can use Siri (discussed in Method 3) or your connected device to go back to the previous song.
3. Method 2: Using Siri Voice Commands
Another way to change songs on AirPods Pro is by using Siri, Apple's voice-activated virtual assistant:
-
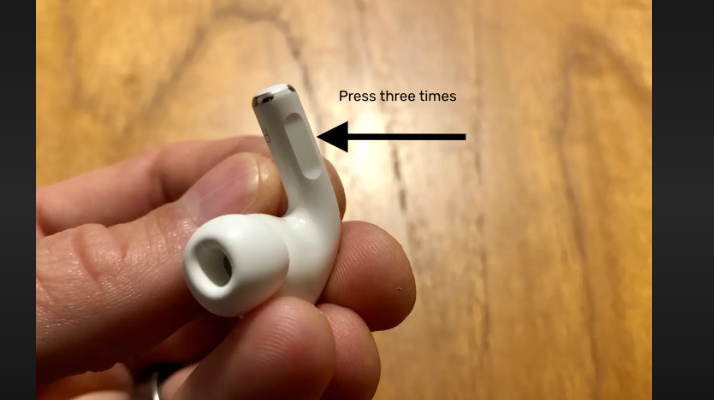
Activate Siri: Say "Hey Siri" if you have this feature enabled on your device. Alternatively, press and hold one of the AirPods Pro stems until you hear the Siri tone.
-
-
Change Song: Once Siri is active, you can use voice commands like "Play next song," "Skip to the next track," or "Play previous song" to control your music playback.
-
-
Note: Siri requires an active internet connection to function, so make sure your device is connected to the internet.
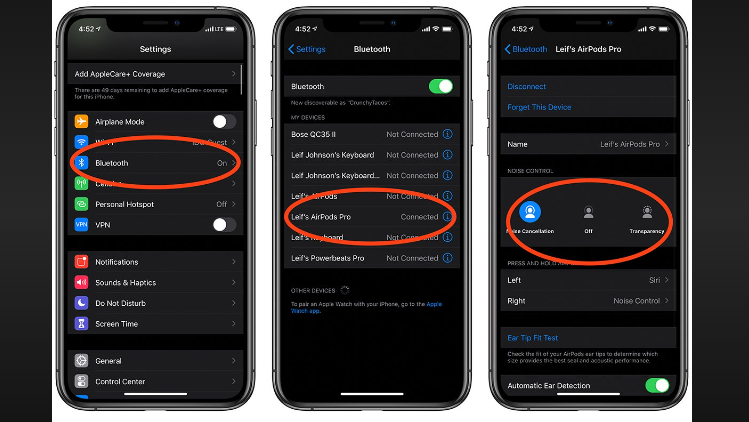
4. Method 3: Customizing Touch Controls
Apple allows you to customize the touch controls for your AirPods Pro through your paired iOS device:
-
Access Bluetooth Settings: Open the Bluetooth settings on your iOS device that's paired with your AirPods Pro.
-
-
Tap on Your AirPods Pro: In the list of connected devices, tap on your AirPods Pro.
-
-
Customize Controls: Under the "Press and Hold AirPods" section, you can customize what happens when you press and hold one of the earbuds. You can choose to change it to "Next Track" or "Previous Track" based on your preference.
-
-
Save Your Settings: Make sure to save your customized controls, and your AirPods Pro will respond accordingly.
5. Using Third-Party Apps
In addition to the built-in touch controls, you can use third-party apps that provide additional functionality for AirPods Pro.
These apps can enable more advanced gestures for song changes and other actions.
However, be cautious when downloading third-party apps and ensure they are reputable and safe to use.
Airpods pro
Changing songs on AirPods Pro is a straightforward process once you understand the touch controls and customization options available. Whether you prefer using automatic ear detection, Siri voice commands, or customizing touch controls to suit your preferences, AirPods Pro offer a seamless and convenient way to enjoy your music without reaching for your device. With these methods at your disposal, you can navigate your playlist effortlessly and enhance your listening experience with ease.