How to Unmerge Contacts on iPhone: A Step-by-Step Guide
Having duplicate or merged contacts on your iPhone can lead to confusion and disorganization. Whether it's a result of syncing multiple accounts or accidental merging, knowing how to unmerge contacts is essential for maintaining a clean and efficient contact list. In this guide, we will provide you with a step-by-step process to unmerge contacts on your iPhone, ensuring that each contact remains separate and distinct.
How to unmerge contacts on iphone?
1. Section 1: Accessing the Contacts App
1.1 Locate the Contacts App Find the Contacts app on your iPhone's home screen. It is represented by an icon with a silhouette of a person.
1.2 Launch the Contacts App Tap on the Contacts app to open it and access your contact list.
2. Section 2: Identifying Merged Contacts
2.1 Search for Merged Contacts Scroll through your contact list to identify any contacts that appear to be merged or contain duplicate information. Look for entries with multiple names or combined details.
2.2 Open a Merged Contact Tap on a merged contact to open it and view the combined information.
3. Section 3: Unmerging Contacts
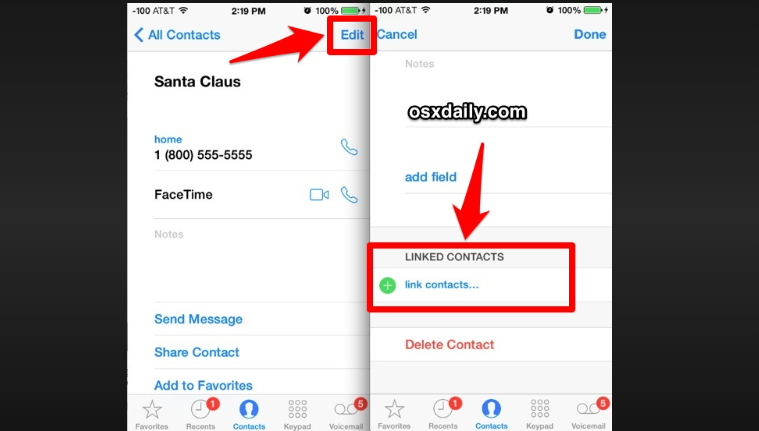
3.1 Edit the Merged Contact Within the merged contact, tap on the Edit button located in the top-right corner of the screen. This will allow you to modify the contact details.
3.2 Separate the Contact Details Scroll through the contact information and identify the merged details that you want to separate. For example, if there are two phone numbers or email addresses merged, tap on the "-" button next to each one to remove them.
3.3 Create a New Contact To separate the merged details, tap on the "+" button next to the specific field where you want to add the separate information. This will create a new contact entry with the selected detail.
3.4 Enter the Separate Details In the newly created contact entry, enter the separate details that were previously merged. For example, if there were two phone numbers merged, enter one of the numbers in the new contact entry.
3.5 Save the Changes Once you have entered the separate details, tap on the Done button to save the changes and exit the editing mode.
4. Section 4: Repeat for Other Merged Contacts
4.1 Repeat the Process Continue scrolling through your contact list to identify and unmerge any additional merged contacts. Follow the steps outlined in Section 3 for each merged contact that requires separation.
4.2 Review and Verify After unmerging the contacts, review your contact list to ensure that all merged contacts have been successfully separated. Verify that each contact entry contains accurate and distinct information.
Unmerge contacts on iphone
Knowing how to unmerge contacts on your iPhone is crucial for maintaining an organized and streamlined contact list. By following the step-by-step guide provided in this article, you can easily identify merged contacts and separate their information into distinct entries. Regularly review your contact list to identify any newly merged contacts and unmerge them promptly to avoid confusion and ensure accurate contact information. With these simple steps, you can effectively unmerge contacts on your iPhone and maintain a clean and well-organized address book.