How to Flip the Camera While Recording on iPhone: A Step-by-Step Guide
The camera functionality of the iPhone allows users to capture precious moments in both photos and videos. However, there are instances when you may want to switch the camera perspective while recording. In this article, we will provide you with a step-by-step guide on how to flip the camera while recording on your iPhone, enabling you to capture moments from different angles and perspectives.
Flip camera while recording Iphone
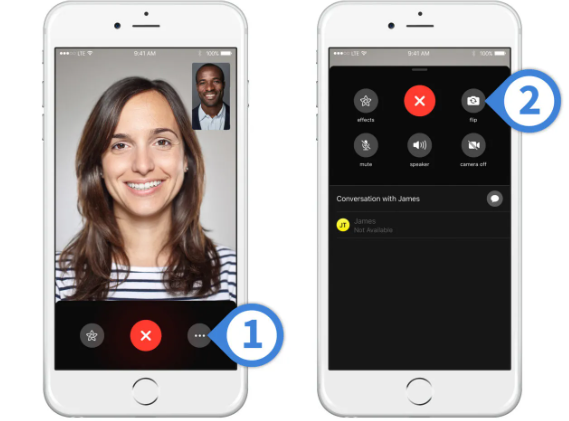
1. Accessing the Camera App:
To flip the camera while recording on your iPhone, you'll first need to access the Camera app. Here's how you can do it:
Locate the Camera App Icon:
- Look for the Camera app icon on your iPhone's home screen.
- It typically appears as a small camera icon and may be found in the Utilities or Productivity folder.
Swipe Up from the Lock Screen:
- If you have enabled the Control Center access from the lock screen, swipe up from the bottom of the screen to reveal the Control Center.
- Tap the camera icon within the Control Center to launch the Camera app directly.
Use the Control Center Shortcut:
- While using any app or from the home screen, swipe down from the top-right corner of the screen (on iPhone X or newer) or swipe up from the bottom (on iPhone 8 or older) to open the Control Center.
- Tap the camera icon within the Control Center to open the Camera app.
Ask Siri:
- Activate Siri by pressing and holding the Home button (on older iPhone models) or the Side button (on iPhone X or newer).
- Say "Open Camera app" or "Launch Camera" to access the Camera app.
Access from the Lock Screen:
- On the lock screen, swipe left to access the Camera app directly.
Once you have successfully accessed the Camera app, you'll be ready to explore its features and start recording videos with the ability to flip the camera for different perspectives.
2. Accessing the Camera App
Locate the Camera app on the iPhone's home screen or lock screen
Launching the Video Mode: Open the Camera app and swipe to the video mode
Positioning the Camera: Adjust the camera's position to frame the desired subject or scene
Start Recording: Tap the red record button to begin video recording
Flipping the Camera: Find the flip camera icon during recording. Tap the icon to switch between the front and rear cameras
Adjusting Focus and Exposure: Touch and hold on the screen to lock the focus and exposure on a specific subject or area
Recording Multiple Clips: Stop the recording by tapping the red record button again. Start a new clip with the flipped camera by tapping the record button once more
Editing and Finalizing the Video: Use the built-in Photos app or a third-party video editing app to edit and enhance the recorded video
Considerations and Tips: Flip the camera smoothly to avoid interruption or camera shake. Ensure sufficient storage space on the iPhone for recorded videos
Once you open the Camera app, swipe left or right until you reach the video mode. The video mode is indicated by a red record button.
3. Practice and Experiment:
To become proficient in capturing videos with different camera perspectives, practice using the camera flip feature in various settings.
Experiment with different angles and camera movements to add creativity and variety to your videos.
Camera Iphone
With the ability to flip the camera while recording on your iPhone, you can expand your creative possibilities and capture unique perspectives in your videos. By following the step-by-step guide outlined in this article, you can easily switch between the front and rear cameras and record dynamic and engaging footage. Remember to practice and experiment with different angles and camera movements to unleash your creativity and produce captivating videos with your iPhone.